Community Sampler Week #13

Community Sampler Week #13

BG0A6616.jpg

This is it, time to start putting all those beautiful blocks together into a quilt! Today is all about setting your on-point blocks into 17-1/2'' unfinished squares and assembling the center of the quilt. If you don't plan on adding any of the optional borders (covered next week) you can move on or wait until finishing is covered in week #15.

If you've just found out about this sew along, don't worry, you can still join in on the fun but you may want to start from the very first post and work up to the present. There are eleven blocks in our quilt, block setting, and optional borders. Each Wednesday will be a new PDF block release or finishing step for the quilt. If you are just joining us, pick up the Introduction PDF on the Sew Along page and you'll get a material list along with coloring pages so you can get started planning your quilt. Then, work your way through the first Community Sampler post to the present.

My co-host and sister Art Gallery Fabrics designer Maureen Cracknell and I are so happy to have you sewing with us and can't wait to see your finished quilts.

CS Promo 1.jpg

Please cut your pieces EXACTLY as given in each of the PDF instructions because bumping up the size of the pieces from the measurements give will not bring great results in some cases. Take advantage of my in-blog tutorials for each of the different quilting techniques used in our sampler.

Accurate cutting and use of a true 1/4'' seam allowance is a must for successful patchwork piecing. All your blocks will measure 12-1/2'' square (unfinished). Review how to cut strips, sew with a true 1/4'' seam allowance, and other helpful piecing tips on my "Are You Ready to Sew" post.

Let's start setting our blocks. Download the free PDF on the Sew Along page.

BG0A6610.jpg

Probably your biggest hurdle this week will be in selecting fabric(s) for the background setting. I already had in mind to use the Art Gallery Fabrics Pure Elements solid called Sweet Macadamia (PE-471) but still needed to see how the blocks looked with my choice before I started cutting into my yardage. 

To really get a good feel for how things looked and block placement I pinned the fabric to my design wall then pinned the blocks to the fabric. I took quick photos with my phone of the various options and then I could look at the options on my phone to know what I liked best. I narrowed it down to two very close versions and sent the images to Maureen to get her opinion and help solidify my choice.

Block Setting Tutorial

IMG_6126.jpg

To start, you'll need to cut twenty-one 9-1/2'' squares. Since I'm using all the same fabric to set my blocks, I cut six 9-1/2'' x 42'' strips and then sub cut the strips into the 9-1/2'' squares.

Because rotary cutter rulers aren't wide enough to cut 9-1/2'' wide strips, you'll need to double up rulers to get the necessary measurement. Just be sure to keep the markings aligned to the straight edge of the fabric and hold the ruler closest to the cutting edge when using the rotary cutter.

Setting 1.jpg

Once your squares are cut, divide them in half diagonally, as shown.

IMG_6115.jpg

As directed in the PDF instructions, fold the block in half twice and finger press to crease. Fold a background triangle in half once and finger press to crease. Note: No need to press creases into the New Four-Patch block because the block's seam lines can be used as center marks. 

Setting 2.jpg

With right sides together, use the crease lines to match the center crease lines of a block and a triangle on one side of a block. Pin and stitch with an accurate 1/4" seam allowance. Press corner open.

IMG_6119.jpg

Repeat on the opposite side. 

IMG_6120.jpg

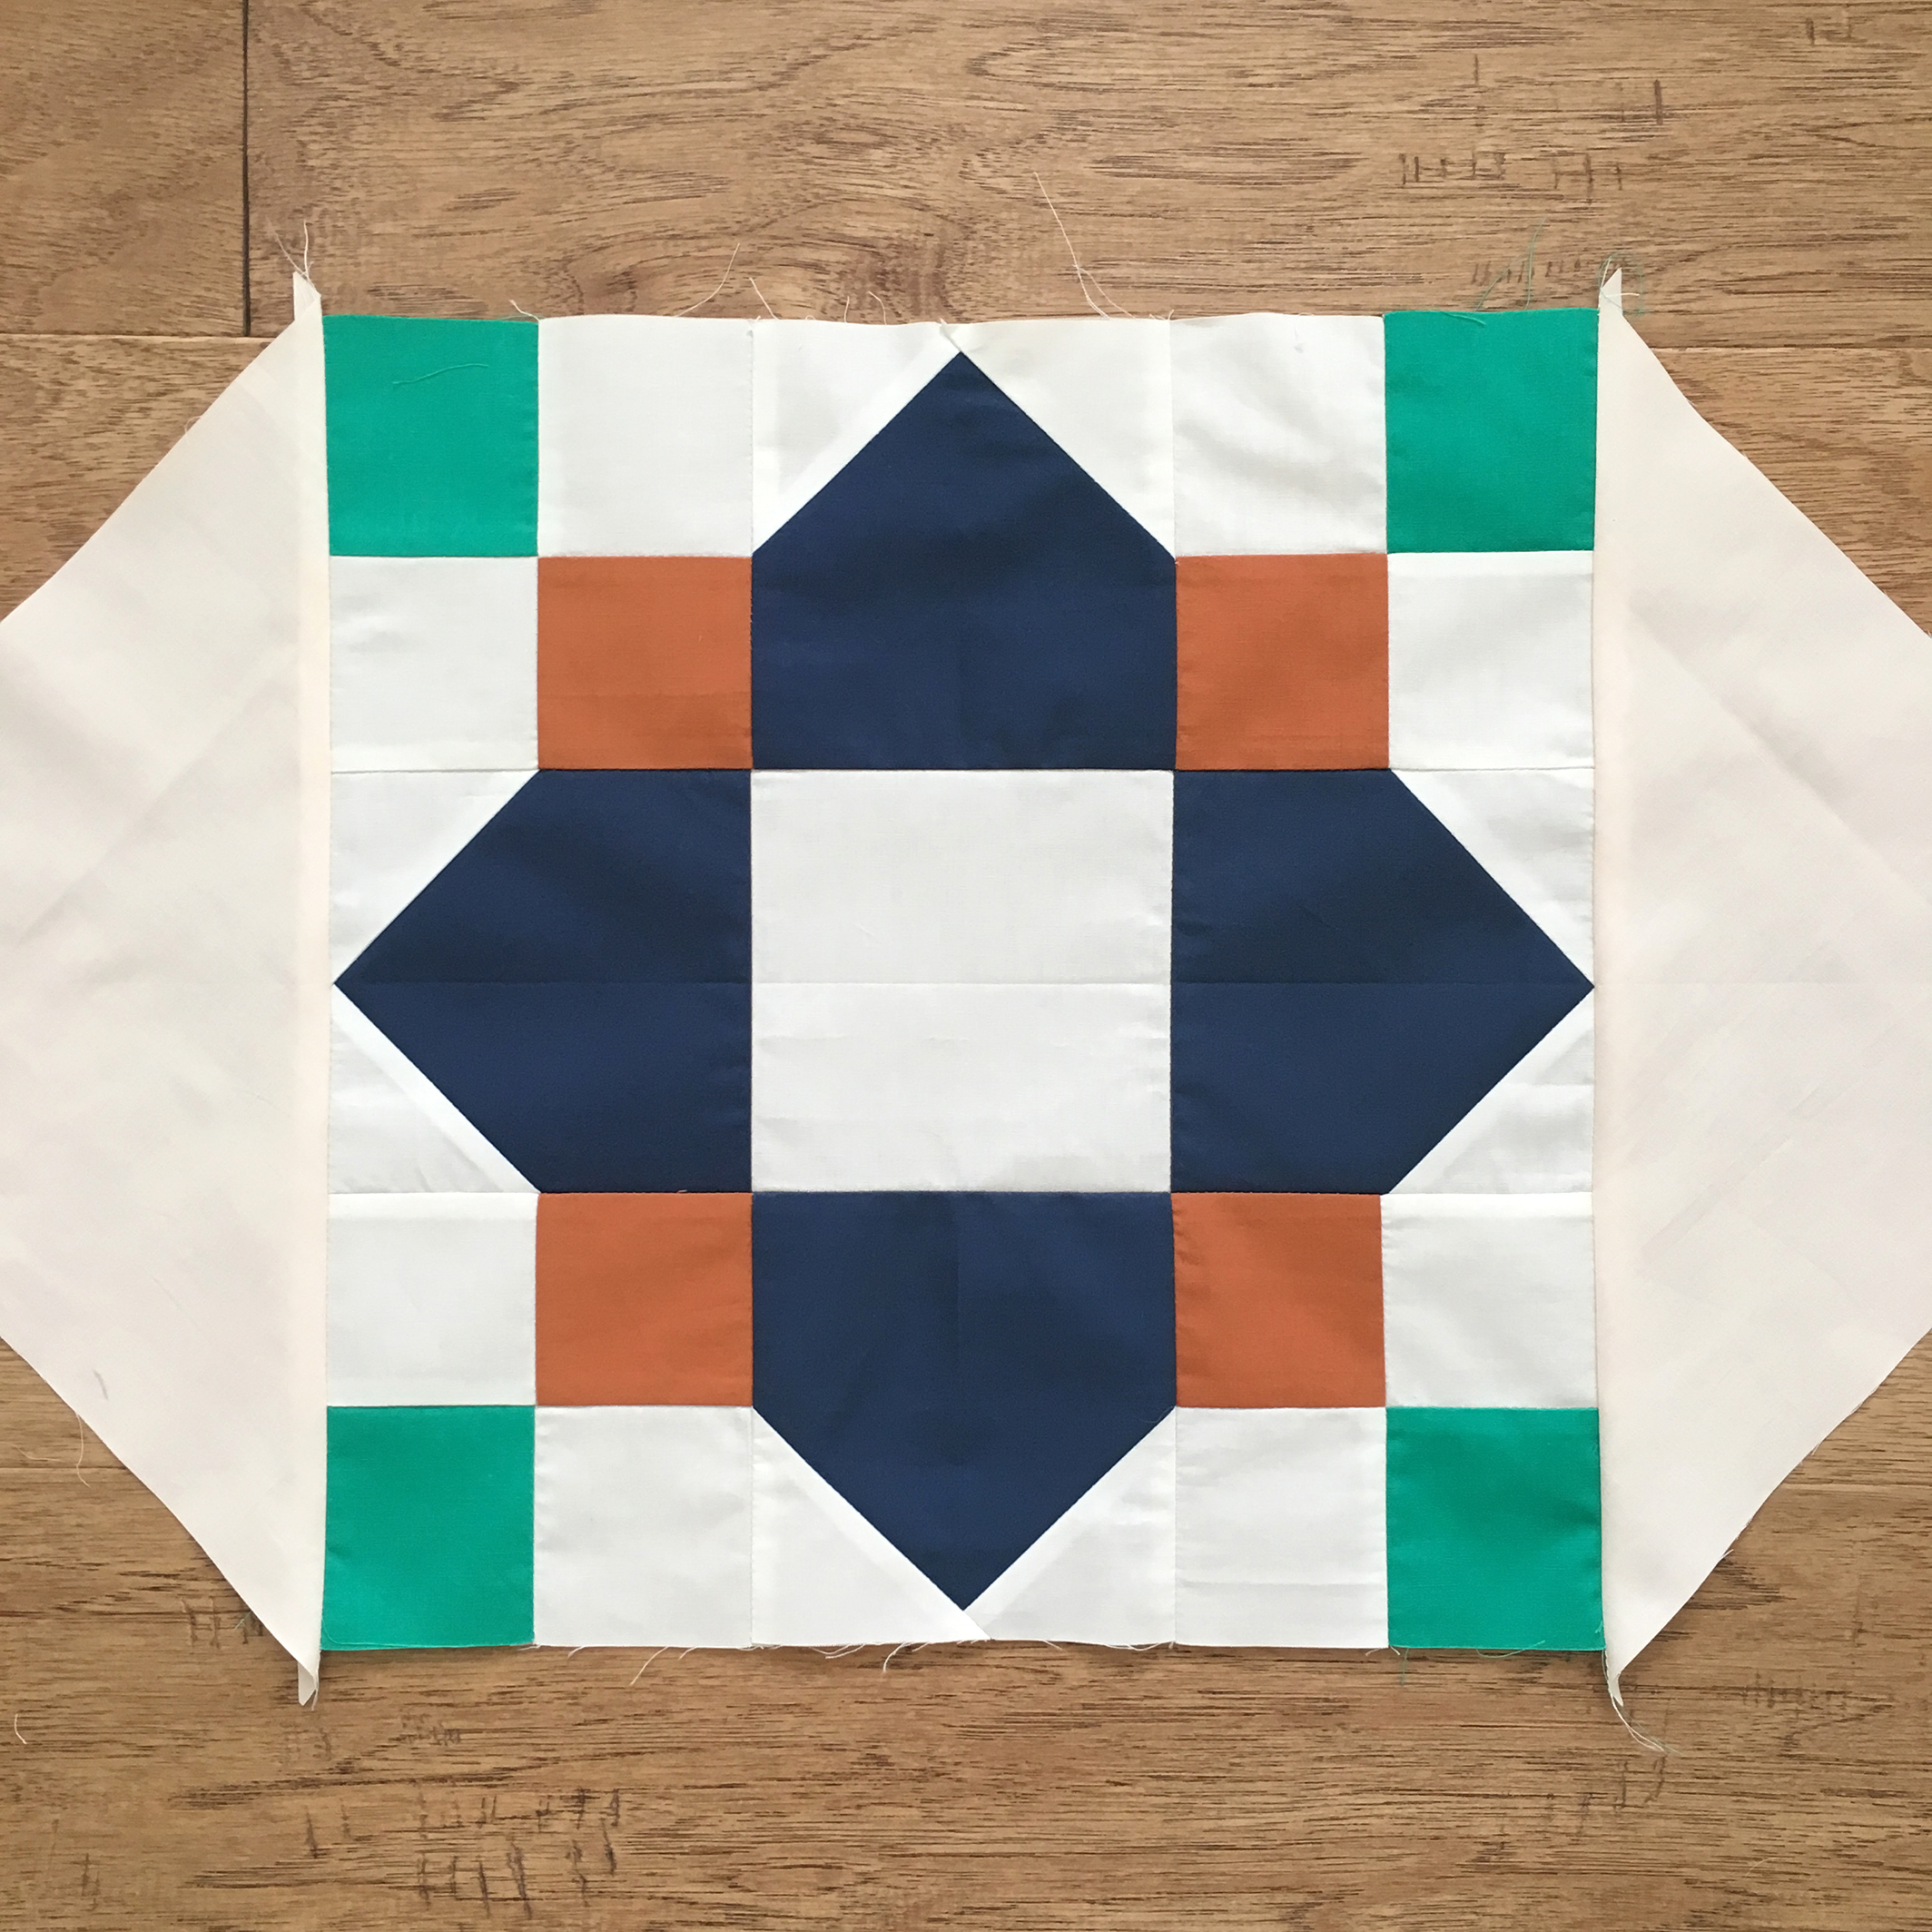
In the same manner, add triangles to the remains sides of the block. Notice how the stitching line enters and exits the "V" created by the perpendicular triangles.

IMG_6121.jpg

Press corners open. Make a total of nine full blocks.

Setting 4.jpg

Trim block to 17-1/2'' square. Please note that very little trimming will be needed if you've cut and sewn accurately. You're basically trimming off the dog ears and doing a tiny bit of tidy up (picture on right). Use the widest ruler you have to square off the true sides of each triangle (picture on left).

IMG_6130.jpg

Here's the total amount of trimming from all the blocks (full and half) so go easy on the trimming!

I know in the directions it says to fold the half-blocks in half to crease but in reality it's not necessary because you can use the seam lines as the guide. Use a folded crease line of a triangle and attach triangles to the half-blocks in the same manner as above. Trim half-blocks to 9'' x 17-1/2'' and make a total of three half-blocks.

BG0A6626.jpg

Referring to the Quilt Assembly (without borders) Diagram on the PDF and noting placement of full and half-blocks, lay out the blocks in three vertical rows of four blocks each. Join block into vertical rows. 

IMG_6149.JPG

Join the rows by matching the edges of the rows and using the point of the center of the block to match a staggered seam line. This completes the center of the quilt top without borders.

Feel free to stop here and quilt as desired or wait for the finishing instructions on week #15. Next week on week #14, we will give instructions for creating the three borders.

COMMUNITY SAMPLER SPONSORS

My co-host Maureen Cracknell and I are continually amazed by the joy and excitement each of you bring to our virtual community. Thank you for making this sew along so special. Please visit Maureen's blog and see the progress she's making on her sampler quilt, using her beautiful AGF fabrics Love Story collection. Be sure to use the #CommunitySampler hashtag when posting your blocks to Instagram and tag both my @sharonhollanddesigns and @maureencracknell so we don't miss any of your beautiful work! But, please be patient with both Maureen and I over the next few weeks if we don't comment back. Both Maureen and I are preparing sewing samples for our new spring collections and there's just not enough hours in the day (or energy) to get it all done!

Don't forget that this Friday's a Giveaway Friday on the Community Sampler sew along. Maureen and I will take turns hosting a giveaway each week where one of our generous sponsors will be featured and offering amazing prizes both here on our blogs and also on Instagram. Maureen will be hosting the giveaway this Friday and you'll be instructed how to enter at that time.

Happy sewing!

Community Sampler Giveaway Week #12

Community Sampler Giveaway Week #12

Book and AGF.jpg

Each Friday, throughout the Community Sampler sew-along, that Maureen Cracknell and myself are co-hosting, will be a Giveaway Friday. We've coordinated special giveaway prizes with our amazing participating sponsors for each and every week! If you've happened to miss the first Community Sampler posts, take a look back from the first post Community Sampler Week #1 to get caught up to the present. Feel free to start sewing with us at anytime--it's never too late to join in, and it's free! 

CS Promo banner 2.jpg

COMMUNITY SAMPLER SPONSORS

TODAY'S FEATURED COMMUNITY SAMPLER IS SPONSOR IS Art Gallery Fabrics and Sharon Holland!

AGF-LOGO-highRes.jpg
 

Art Gallery Fabrics was started in 2004. Since then creativity, beauty, and design have been their passions, and to this day, they have not changed, bringing a chic and modern perspective to the quilting industry.

When it comes to designing a fabric collection we always keep originality and uniqueness on the top of our list. We have the pleasure of working with a talented fabric designers who create enticing color palettes and artful, intricate prints that make our collections one of a kind. Art Gallery designs modern fabrics that keep up with ongoing trends and at the same time it encourages our customers to use new colors and patterns so they venture out of their usual comfort zone.

At Art Gallery Fabrics believes strongly in the quality of the fabric and that is transcended in their superior thread count and fine weave. This makes our premium cotton as soft and smooth you can get. You really feel the difference with just one touch!

Pink Cream Edit.jpg

 Art Gallery Fabrics is offering this gorgeous ten-piece pink & cream fat quarter bundle with prints from various AGF designers! Be sure to follow Art Gallery Fabrics on all their social platforms.

Blog  *  Facebook *  Instagram  * Pinterest  *  Youtube

Pink Cream2 Edit.jpg

Sharon Holland logo-04.jpg

Sharon Holland (that's me) is the author of Utility-Style Quilts for Everyday Living by Sharon Holland (Landauer Publishing 2017). This quilt book is as much a lifestyle book as it is an 80-page, beginner-friendly guide to patchwork. Find easy-to-follow instructions, beautiful photos, fully illustrated step-by-step essential techniques and information to stitch 12 different quilt projects from beginning to end.

Each project is fast-pieced and encourages creative changes with skill-building design tips throughout. The lovely patterns are a reason for you to dig into your stash to make quilts you love. This paperback book encompasses traditional and modern quilting for truly timeless everyday use and functional patchwork.

You can purchase this book from your local quilt shop, favorite bookstore, online like through Amazon (my affiliate link), or from my Store page. If you order from me you'll have the option to have a signed and/or dedication written in your book by the author (me). 

Night and Day.JPG
 
Finishing.JPG

For this week's Community Sampler giveaway one lucky winner will receive the Art Gallery Fabrics 10-pc ............ bundle plus a signed copy of the Utility-Style Quilts for Everyday Living book!

Giveaway now Closed. Congratulations to Angie Terry!

Note: This giveaway is open to EVERYONE! If you're a "no reply" or anonymous commenter, please remember to include your email address in your comment--you can't win if I can't get a hold of you!

1. Simply leave a comment here under this post! (First comment entry).

2. Follow Art Gallery Fabrics on their Blog and/or FACEBOOK. Just let me know that you did by making a separate comment here to record that entry. (Separate comment - second entry). 

3. My followers get a third entry! If you follow via subscribing to my posts, through Bloglovin (or other service), or on Instagram, just let me know by making a separate comment here to record that entry. (Separate comment - third entry). Note: I'm no longer on Facebook.

4. Help spread the word!! I know that many of you already do, so I thought it would be nice to add that as another way to enter! Spread the word about the Community Sampler on YOUR instagram, facebook, tweet, pin, blog post, etc... (separate comment - fourth entry). 

That’s FOUR possible entries! Enter now through Monday, May 14th! The winner will be picked at random around 4pm Eastern. I will post the name of the winner on this post once they've been notified and responded to my email.

Love,

Sharon


Community Sampler Week #12

Community Sampler Week #12

BG0A5247.jpg

I can hardly believe we're at our last block already! But don't worry, that doesn't mean the Community Sampler is over yet, we still have block setting and the optional borders to attach. My co-host and sister Art Gallery Fabrics designer Maureen Cracknell and I are so happy to have you sewing with us and can't wait to see your block.

CS Layered Sharon.jpg

There are eleven blocks in our quilt, block setting, and optional borders. Each Wednesday will be a new PDF block release or finishing step for the quilt. If you are just joining us, pick up the Introduction PDF on the Sew Along page and you'll get a material list along with coloring pages so you can get started planning your quilt. Then, work your way through the first Community Sampler post to the present.

Many of the patchwork units (like Quick-Corner, Flying Geese, Half-Square Triangle, and Square-in-Square units) used in this year's sampler have already been oversized to allow for trimming and squaring of units before assembling your block. Please cut your pieces EXACTLY as given in each of the PDF instructions because bumping up the size of the pieces from the measurements give will not bring great results in some cases. Take advantage of my in-blog tutorials for each of the different quilting techniques used in our sampler.

Accurate cutting and use of a true 1/4'' seam allowance is a must for successful patchwork piecing. All your blocks will measure 12-1/2'' square (unfinished). Review how to cut strips, sew with a true 1/4'' seam allowance, and other helpful piecing tips on my "Are You Ready to Sew" post.

Let's start sewing the final block in our sampler--Sawtooth. Download the free PDF on the Sew Along page.

BG0A5377.jpg

TUTORIAL FOR PIECING THE Sawtooth BLOCK

The success of this block rest solely in your ability to cut and sew accurately. You'll be put to the test here and hopefully rewarded for your efforts.

If you're wanting to use directional prints for the HST units you may want to check out my tutorial for controlling directional prints that was posted during the Sewcial Bee Sampler sew along. 

Sawtooth 1.jpg

In the CUT section of the instructions you're told to cut fabric C and D in half diagonally, as show above. Handle these pieces with care so as not to stretch the bias edge. You'll only be using one of the large triangles.

Make the required Half-Square Triangle (HST) units as explained in the PDF download. For a tutorial on making HSTs visit my earlier tutorial HERE from week #3.

Sawtooth 2.jpg

Referring to the block assembly diagram on the PDF, sew two HST units together and one fabric C triangle. Notice how the edges of the fabric C triangle match the edges of the HST section at a right angle. The tip of the fabric C triangle extends past the upper edge of the HST section. The 1/4'' seam will enter where the fabrics form a "V". Press open.

Sawtooth 3.jpg

In the same manner and noting orientation, sew a fabric D triangle to the section. Notice how the extended tips form a "V" and the 1/4" seam allowance enters at that point. Press open. Trim dog ears to reduce bulk. 

Sawtooth 4.jpg

Sew the 3-1/2'' fabric A square, two HST units, and the remaining fabric C triangle together as shown. Sew to the remains side of the fabric D triangle to make the half block. 

Handle this block carefully to keep from stretching the long bias edge.

Also, this is a good time to remind everyone that our Cactus block should also be half blocks for the construction of the quilt top. If you've sewn that block together is will need to be separated into two diagonal halves like our Sawtooth block. 

BG0A5495.jpg

The fabrics I'm using for my sampler quilt are Art Gallery Fabrics Pure Elements solids. This block made me think of a hill with pine trees so I kept my palette simple and harmonious, like in nature.

The print shown in my photos is a re-coloring of my Woodblock print and this lovely turquoise coloring is found in the new Splendid Fusions from Art Gallery Fabrics.

BG0A5247.jpg

Community Sampler Sponsors

My co-host Maureen Cracknell and I are continually amazed by the joy and excitement each of you bring to our virtual community. Thank you for making this sew along so special. Please visit Maureen's blog and see the progress she's making on her sampler quilt, using her beautiful AGF fabrics Love Story collection. Be sure to use the #CommunitySampler hashtag when posting your blocks to Instagram and tag both my @sharonhollanddesigns and @maureencracknell so we don't miss any of your beautiful work! But, please be patient with both Maureen and I over the next few weeks if we don't comment back. Both Maureen and I are preparing sewing samples for our new spring collections and there's just not enough hours in the day (or energy) to get it all done!

Don't forget that this Friday's a Giveaway Friday on the Community Sampler sew along. Maureen and I will take turns hosting a giveaway each week where one of our generous sponsors will be featured and offering amazing prizes both here on our blogs and also on Instagram. I will be hosting the giveaway this Friday and you'll be instructed how to enter at that time.

Happy sewing!

Not Going to Market, Prep

Not Going to Market, Prep

BG0A5975.jpg

Yes, you read that right. I've a new fabric collection for Art Gallery Fabrics (available this month) and is part of the AGF Spring Quilt Market lineup but I won't be attending the spring show in Portland for many reasons. 

Signature is my sixth fabric collection for Art Gallery Fabrics. I'm very excited about this collection, especially since my last collection, Bountiful was over a year ago. It's really fun to be sewing with a new collection and this year spring came early with the arrival of my strike offs--it was like receiving a bouquet of flowers!

Visit my Fabrics page to see a list of online shops stocking this collection. I will be adding to this list as more shops get it in later this month. 

BG0A5950.jpg

This joyful collection has put the natural world into patterns of budding florals, butterflies, and forest animals--all in my signature hand-drawn style. Blooming prints emerge in a riot of springtime colors of robin’s egg blue, cool teal, sunny yellow, radiant fuchsia, and dappled-shade green.

Free quilt pattern for Signature fabrics designed by Sharon Holland. Visit Art Gallery Fabrics for more details and download.

Free quilt pattern for Signature fabrics designed by Sharon Holland. Visit Art Gallery Fabrics for more details and download.

With each new fabric collection for Art Gallery Fabrics comes a new free quilt pattern. I've designed Sunflower for my new Signature fabrics and it will be available for download once the fabrics are available later this month. 

AGF has many Pure Elements solids, denims, and blenders that coordinate beautifully with this collection. 

Product mock-ups with Signature fabrics from Art Gallery Fabrics 

Product mock-ups with Signature fabrics from Art Gallery Fabrics 

I love how Art Gallery Fabrics shows you how the prints look in virtual products from clothing to home decor. Once the collection is available they will also publish the most amazing Look Book for this collection!

Signature fabrics by Sharon Holland for Art Gallery Fabrics

Signature fabrics by Sharon Holland for Art Gallery Fabrics

Instead of going to Quilt Market and promoting my collection for a weekend, I will be showing you even more exciting ways to use these prints right here from home. I've recently remodeled my sewing room/guest room to be a functioning sewing room/photography studio. If you've been following along on Instagram you will have seen the trials and triumphs of my remodel. 

Over the next several weeks I intend to create "booths" in my new space that will surpass what could be accomplished at Market with limited wall space, furniture rentals, and time and logistic handicaps. From here I can resource my great props, set up larger and more detailed vignettes and show you more. 

Here's a peek at some of the things I've been working on....

Art Rollup reduced.jpg

With Mother's Day next weekend, I remade my Art Roll-Up pattern in my Signature fabric. Using A Rose is a Rose Forever and Lacey Star Dust prints together with AGF Smooth Denim in Frosted Sage. This sewing project is a quick and thoughtful item for not only moms but grads, and hostess gifts as well. 

BG0A5970.jpg

The Art Roll-Up is a free pattern found on my Free Pattern page. This quick project can be used to hold makeup brushes, art brushes, knitting or crotchet needles, cutlery, etc. 

BG0A5570.jpg

To be able to create booths here at home I need to make stuff! I've had an extremely busy spring with a new grand baby in April, the room remodel going longer than originally planned, yard work that happens every spring, and of course the Community Sampler running in the background. 

BG0A5721.jpg

It's always nice to get that first project under your belt when you have a mile long list of things to make. I decided to start small and this lampshade recover was my first finished project!

IMG_5812.jpg

Ta da! Recovered using the Flora and Fauna Hidden print in cotton, I love this modern toile print for my antique floor lamp! 

IMG_5865.jpg

Those of you sewing along with Maureen Cracknell and I for the Community Sampler will recognize this block as the Cactus block. I loved this block so much that I've designed a new quilt around it. Once I've gotten it quilted, photographed, and posted, I will also have instructions on how to make one like mine. 

There's lots more to share with you (and make) but I wanted to take a moment and share this sneak peek post with you before I got any further along. My plan is to each week theme a booth and really give you a Look Book-style feel about this wonderful collection. 

Be sure to tell your local shops you'd like them to stock Signature from Art Gallery Fabrics and be watching in just a couple of weeks for it to be on the shelves and ready for your next project. 

Happy sewing,

Sharon